Monday, February 20, 2017

Top Signs That Your Garage Door Needs to be Replaced

The garage door is one of those parts of your home that you don’t really give that much attention to. As long as it opens and closes the way it is supposed to, there’s no way you are going to spend time thinking about it. However, just like your roof, air conditioning, heating equipment and all appliances inside, it needs to be maintained and inspected from time to time.

Since you’re using your garage doors every single day as you move in and out of the space, it means that this substantially huge and heavy object will eventually have performance issues sooner or later. And if something is broken, you expect to shell out money for repairs. It’s a good thing if you can detect problems early because you could avoid more expensive repairs. But then again, there are times when the garage door needs replacement rather than repair. Here are the signs:

1 – It won’t open or close.

Once you find out that the garage door no longer opens or closes when you use the control buttons, it only means one thing – it needs to be fixed the soonest possible time. There actually can be several different reasons why it won’t open or close, one of which an existing bad connection between the control panel and the door itself. It can also be because of a complete door malfunction. If the controllers no longer function the way they’re supposed to, then that’s the time you need to call an expert to have it checked since more likely than not, you will need to have it replaced.

2 – It responds slower than usual.

If you observe that your garage door’s response to your commands is slower than usual, it is a clear sign that there is something wrong with either the door opener or door itself. If you press the opener, it is supposed to open without any delay, but it there is, you can’t fix it on your own and you need the expertise of a garage door repair pro.

3 – Some sections of the door are sagging.

In order to make sure you avoid accidents involving your garage door, you must ensure you check and test is balance every now and then. If some sections are sagging, it is a sign that something needs to be fixed fast. To do the inspection, you need to disconnect the opener from the door and try to operate it manually. Now try bringing the door midway and then leave it in that position for several seconds. What you want to observe here is if it will continue falling or will go up again. In both cases, it only means that the tension spring is broken or other parts are troublesome. If any parts are broken, it’s time to replace them, but you don’t do it on your own. Call the professionals.

4 – It makes a lot of annoying noise.

Finally, if your garage door makes a lot of noise that isn’t supposed to be there, there may be a problem with the opener bracket, spring, or the entire door itself. There’s no way you can troubleshoot it on your own, much more fix it. Therefore, if you don’t want to be forced to replace you garage door so early in its life, call the experts to have that noise removed.

Thursday, May 26, 2016

Top Tips When Finishing a Basement

The basement is a unique area in your house. It is usually portrayed in films as that one space where someone who has secrets will try to keep them. It is usually dark, scary, and full of rats and roaches. In reality, it’s actually a space with a lot of potential. It’s not just cold concrete down there with so many stored stuff. Although it is the lowest floor in your home, you can actually tap its potential by learning how to utilize it.

In this article, we’ll be talking about some ways in finishing a basement. Trust us, you’ll love it when it’s done!

(photo credit: HouseLogic.com)

Here’s the first set of tips from an expert, in the article “Basement Finishing Tips” for FamilyHandyman.com:

First, Dry it Up

If you have a damp or wet basement, you have to fix it before you start any finishing work. The good news is that most water problems can be remedied by two measures: grading the soil to slope away from the foundation and adding or repairing gutters and downspouts. If these steps don’t work, you’ll have to take more extreme measures like adding exterior drain tile and waterproofing the walls or adding interior drain tile that empties into a sump basket with a pump. Eliminating water problems is time consuming and expensive, but it’s critical to prevent a moldy and ruined finished basement.

Seal the Rim Joists

Uninsulated rim joists are huge energy losers. Now’s the time to insulate and seal your rim joists. One option is to seal the rim joists with rigid insulation cut to fit. We recommend a minimum of 2-in.-thick extruded polystyrene, but check your local codes to see what’s required. If you have a table saw, use it to cut strips equal to the depth of your joists. Then use a fine-tooth handsaw, utility knife or miter saw to cut the strips to length. Fill small gaps with caulk, and larger ones with expanding spray foam from a can.

Install Drainage Mats for a Warmer, Drier Floor

Plastic drainage mats, or dimple mats, allow air to circulate under the flooring and provide a moisture barrier. They also provide an insulating layer of air that separates the floor from cold concrete, reducing the potential for moisture damage from condensation or water vapor migrating through the concrete.

Vary Your Lighting Choices

For the most interesting space, include several kinds of lighting in your plan. Start with good general illumination for times when you want a brightly lit room. Plan to add a dimmer switch to control the amount of light. Recessed can lights, ceiling fixtures and fluorescent “pillow” lights are a few types of general lighting. If you’re worried about noise traveling upstairs, don’t use recessed can lights.

Get more from this article about basement finishing by clicking the link.

Based on the tips given above, one of the most important aspects in successfully finishing your basement is to take care of the floor, making sure it is dry and clean. You can’t just jump to decorating and furnishing without first making sure that the floor is already fitted and perfect to be labeled as livable.

(photo credit: HGTV.com)

Our next set of tips meanwhile comes from BHG.com, in a blog post titled “Smart Tips for Finished Basements.

Know Building Codes

Basement rooms must be at least 7X7 feet and have a minimum ceiling height of 84 inches over 50 percent of the floor area. Bathrooms, hallways, and task areas can have ceilings that dip as low as 76 inches in some spots. All bedrooms window need to be at least 20 inches wide and 24 inches high, or 5.7 square feet, and no more than 44 inches off the floor. Having a room that matches these dimensions will ensure that people can walk around comfortably and escape in case of an emergency.

Make an Entrance

Consider your stairway location and how it leads you into the basement space. Ideally the stairs will lead to a family room or a main gathering area. Stair risers should be no more than 8 inches tall, and the treads must be at least 9 inches deep. Although regulations vary from region to region, most require that stairs have guardrails at least 34 inches high and that the guardrails must have intermediate rails or posts or other ornamental fill that will not allow objects 4 inches in diameter or larger to pass.

Bring in the Light

Bringing in natural light is one of the biggest challenges when creating a basement room. Window wells are the most common solution where the window-opening height is below ground level. In case of an emergency, you can climb out the window and up the well. Choose window well locations carefully so you can make them as wide and deep as possible. The wider and deeper the well, the greater the amount of sunlight flowing into the basement.

Have an Escape Route

Check your local building codes to determine if they require egress windows for a basement bedroom. Egress windows must be large enough for a firefighter in full gear to get into a burning house and for occupants to safely escape if the stairway is blocked. If you can’t install egress windows, consider adding hinged outside access doors.

Read more and get additional tips by visiting this link.

In the end, although you don’t really pay that much attention to your basement, you need to realize that it can actually be transformed into something that can be used as a typical room – a room that’s similar in look, feel, and functionality to that of your rooms above it. However, this type of DIY home improvement project will need tons of effort and time to make it successful. So if you happen to be someone who isn’t really a fan of doing your own projects at home, then this isn’t for you.

Monday, May 9, 2016

Best Ways to Make Your Home Smell Better and Fresher

Scents make memories and lasting impressions. That’s why if you want anyone who visits your home to get that lasting impression, you should make an effort to make it smell better and fresher. The thing with typical home improvement is that you seem to be focused solely on what is seen, not what is smelled. The key is to giving your home that distinctive smell to not just give a positive impression but also to make your space a lot fresher and better overall.

So here are the best ways to do that:

Let’s begin with the very simple ones from GoodHouseKeeping.com, in the article “7 Ways to Make Your Home Smell Amazing.

Make a stove simmer.

“I learned this from my crafty and cleaning obsessed mother,” says interior designer Rhobin DelaCruz. “Simmer water in a small saucepan and add citrus slices and herbs, like lavender or mint.” The heat permeates the sweet scent throughout your house — an easy trick that is as lovely for a party as it is for any ol’ Tuesday.

Clean your garbage disposal.

Notice a lingering stink? Might want to check the sink. “First try spritzing a dollop of lemon-scented dish soap down into the disposal, run the water, then turn it on,” says interior designer Keita Turner. You can also run lemon or lime rinds through the disposal, followed by lots of water. If the smell persists, pour in a 1/2 cup of baking soda while running warm water.

Place candles strategically.

Candles are an obvious way to make your home smell sweet, but some clever placement can increase their efficiency. “Anchor a few candles where you would least expect them to be — but don’t light them,” says interior designer Dee Murphy. “Try the linen closet, or anywhere fabrics might live and be able to absorb the scent. Not only do you get a nice surprise every time you open the door, but your linens will carry the aroma with them wherever you use them.” Unstopables candles have a long-lasting scent and come in cool, modern designs.

Bring the outside in.

“Indoor plants clean the air while beautifying your home,” says Turner. And many offer pleasant fragrances, too. Turner suggests geraniums, Arabian jasmine, eucalyptus, gardenias, corsage orchids, and Cuban oregano.

You want some more tips from this post? If so, simply click this link.

Candles have always been a great way to improve the smell of a room or confined space, but you can actually use them to do the same for a bigger space like your living room, and all that needs to be done is to put them strategically. You don’t have to sweat this because there are so many scented candle varieties you can purchase. Likewise, you will want to consider putting plants inside, especially those that have natural fragrances. Aside from being totally safe, they also give your home some fresh green look inside.

Next up, let us see these tips from ApartmentTherapy.com, talking about the ways to upgrade your home’s smell during the holidays:

Aromatic Wax Fire Starters

Toss one of these wax bombs into the fire. The dried leaves and pinecones will keep the fire burning, while cinnamon and rosemary fill the air. From Hello Natural.

Olive Oil Candle

Common household olive oil combined with a few drops of essential oil makes for a long-lasting liquid candle. Mix it up at any moment with just a mason jar, wick string and a paper clip. From Little House Living.

Simmer Pots

A smell-good classic, and it couldn’t be easier. Choose a few aromatic spices, herbs and fruits, cover them with water and heat it up in a saucepan on the stovetop (or in a fondue pot). Don’t know where to start? Here are five of our favorite simmer pot recipes to get you started.

Homemade Potpurri

The simmer pot’s less-complicated cousin. Mix some great-smelling stuff together, and leave it in a dish. Depending on your ingredients, it will leave behind a subtle smell for weeks. For extra credit, dehydrate thin slices of apples and oranges by baking them in the oven, like Julie Blanner does on her blog.

Homemade Reed Diffusers

Air fresheners like these go for $30 at a home store, but the raw materials to make your own are really inexpensive. Free, even, if you have bamboo skewers at home in the kitchen. Check out materials and instructions here.

Make Your Own Scented Candles

This is one of those deceptive projects that can really impress. Making your own scented candles is as easy as melting wax chips (available at craft stores) and layering in your favorite natural aromatics. These vanilla and coffee-scented candles are from Hello Natural.

Read the rest of this article here.

We bet after reading all those different ways of improving your home’s smell you’re probably very excited to try them all out. Just keep in mind that all it takes is effort and some experiments. You can’t figure out what you really want if you don’t try them.

Tuesday, April 26, 2016

The Things You Should Know About Landscaping

As a homeowner, you are certain to be very interested in landscaping. Not only does it give your home that much needed upgrade in its curb appeal, it also provides you a fresh environment and living space. There really is no downside involved in landscaping and landscape design. But it’s a kind of work that will have to be taken seriously should you want to achieve success.

(photo credit: SabinesHomes.com)

In this article, we will be providing you the information you need to know about landscaping in general. The objective is for you to have a complete understanding of the project you hope on carrying out, whether you’re doing it yourself or you’re hiring someone else such as landscaping pros.

Let us begin with a post by Jamie Wiebe, titled “Dirty Secrets: 9 Things Your Landscape Designer Wishes You Knew” for Realtor.com. As the title suggests, these are the secrets that a landscape design contractor wouldn’t normally tell you.

1. They don’t deal just with flowers

A landscape architect or designer will work with you to create a grand plan that encompasses your whole property, from installing a new driveway to adding a porch to grading your lawn. If you’re just looking for someone to arrange your flowerbeds, you want a garden designer.

2. You should research the relevant regulations

A landscape architect’s job is significantly easier when you, the homeowner, know the relevant regulations that govern your property. Are there any homeowners association rules you need to follow? What are the local guidelines designating how close to the property line you can landscape? (These are called setback regulations.) And make sure you know where those property lines are.

“It’s great to get this stuff out right at the front of the project,” Reed says. “If they’re not known, then the designer will do things and then discover that they’re not allowed.”

Correcting the error(s) means extra time and money for you—and a serious headache for your landscape architect.

3. Understand your property’s major problems

Before hiring a landscape architect, make sure you know the basics of your yard—and its problem areas. Does one sloping hill drain water onto your walkway? Can guests never find their way to your front door? Landscape architects can’t fix a problem they don’t know about.

4. Know how much maintenance you’re ready for

Yardwork is hard work. While some people consider pulling weeds to be meditative, you might find it tedious. Let your designer or architect know how much maintenance you expect to do on a weekly or daily basis. Otherwise, he or she will end up with an unhappy and overworked client (you).

“How much time you can spend will affect the nature of the design,” Reed says.

Eager gardeners might enjoy an elaborately landscaped yard, whereas the less-enthused might want “watering the grass” to be the only requirement. Be realistic about how much work you plan to put into your space—biting off more than you can chew is a surefire route to a dilapidated yard.

5. Know what you want, but be open-minded

A great landscape is a collaboration between the designer and the homeowner.

“If we can find something that satisfies the longings of everyone in the home, then we’ve done the right thing and made the right choice,” Moir Messervy says.

“The main quality I ask for is open-mindedness to new ideas they haven’t thought of—or even already rejected,” Reed adds. “Often the landscape architect can show them how the idea has multiple benefits they might not have thought of.”

Want more of this article? If that’s a yes, then click the link.

You see, there are a lot of things a landscape design company can do for you, not just flowers and plant arrangement. But in order to be successful at building your yard into something attractive and remarkable, you need to work with them by doing your own research in advance. Know the stuff that needs to be known and that alone will give landscaping company a more convenient time working with you.

For do-it-yourself landscaping on the other hand, here’s a very good set of tips from DIYNetwork.com in a blog post called “10 Things You Must Know About Landscaping.

Tip 1: Install a Strong Edging
It’s very important to have barriers between your lawn and your garden. You want to have a strong edging that can be of any material (and price) from cheap plastic all the way up to steel or stone.

Tip 2: Install a Simple Irrigation System
A big mistake people make is not watering enough. Get a simple drip-irrigation system that can be attached to a spigot with a timer. Simply set the timer and it gives the plants all the water they need.

Tip 3: Add Some Mulch
Mulch is primarily used to help maintain the soil, but it’s also decorative. The darker the mulch, the more the color of the plants will stand out.

Tip 4: You Need Good Soil
If the roots of a plant can’t penetrate the soil, then it simply won’t grow. If your soil is really poor quality, you may need to remove it and bring in new soil.

Tip 5: Keep Things in Groups
Try to group things in threes or fives as a general rule. This way, from a distance it will always look full. It’s a good idea to get a variety of colors that will bloom at different times of the year.

Find out the rest of the tips in this article by visiting the link.

Once you start building your own yard, you will realize how satisfying and fun it is. But don’t forget all the things you’ve learned in this post since they’ll come in handy whenever you get stuck with something. Again, landscaping design can be done with you alone or by hiring someone else to do it for you, and your choice depends on the question of whether or not you have what it takes to do it DIY style.

Wednesday, March 16, 2016

Top Gardening Mistakes One Has to Avoid

Gardening is fun. Everyone would love to see blooming flowers, thick trees, and butterflies outside their homes. The presence of plants, whether they are vegetables, flowers, shrubs, or anything green, just gives a refreshing feel. Although most of us think the garden is just for aesthetic purposes, it actually helps in so many different ways. For one, it keeps your surroundings clean and fresh and the plants keep seem to have that cooling effect.

But just like most DIY projects, there are mistakes you will want to avoid to be successful at it. This article gives you the information you need to know about those gardening mistakes.

Even plants don’t need too much water, or it’ll kill them. (image credit: PowerHouseGrowers.com)

In SouthernLiving.com’s article “15 Really Dumb Gardening Mistakes,” our attention was caught by two very common mistakes that beginners are prone to committing. These are overwatering the plants and planting too deeply.

Overwatering Your Plant

Result: The plant turns yellow, drops leaves, rots, or simply croaks.

Giving a plant too much water kills it faster than giving it too little. Although most plants prefer moist soil, they don’t like soggy, poorly drained soil. Waterlogged soil keeps roots from functioning properly. Because of this, overwatered plants may wilt on a sunny day from too much water, not too little.

To lessen your chances of overwatering, keep track of what you water, so you don’t water the same plant 3 times a day. Separate plants that need lots of water from those that need just a little. Before you water, stick your finger about an inch deep into the soil near the base of the base to see if the soil is moist or dry. there are several mistakes a beginner like you will likely commit in trying to build your garden for the very first time.

Planting Too Deeply

Result: The plant’s roots smother and the plant slowly dies.

Roots need air to breathe. They can’t get it when they’re buried 6 feet under. So when you plant a tree or shrub, make sure that the top of the root ball is slightly higher than the surrounding soil. To keep air from drying out the root ball, cover the top with and inch or so of mulch.

See more of this article by going to the link.

Overwatering your plant is a result of you getting too excited about your plant growing fast. Yes, although it really sounds stupid, a lot of homeowners make this mistake thinking that a lot of water is good for plants. The same thing goes for planting too deeply. As mentioned above, the plants’ roots need to breathe and that wouldn’t be possible if they’re way down there entirely covered in soil.

Here is some more information you should be interested in when it comes to overwatering your plants:

Meanwhile, the article “10 Beginning Gardener Mistakes to Avoid” from HobbyFarms.com also has a list of the other possible mistakes you may make in gardening for the first time and how to avoid them.

Gardening Mistake No. 1: Starting Out Too Big

It’s difficult to resist those tempting photos of perfectly ripe vegetables and fruits in seed and nursery catalogs. It’s all too easy to order more vegetable varieties than your garden space and time will permit. Planting too large a garden is a mistake that can place too heavy a workload on a gardener and lead to frustration and burnout.

A better gardening strategy is to start small in the first year and plant only a few of your favorite veggies. This will allow you more gardening success and a greater feeling of accomplishment. In succeeding years, as practice builds your gardening skills, you can increase the size of your garden each planting season.

Gardening Mistake No. 2: Not Properly Preparing the Soil

Without good soil, no vegetable garden can thrive. Any preparation that the soil needs must be done before planting. Once those seeds begin to establish a root system, the soil cannot be disturbed without endangering the tender, young plants.

Prepare the soil as early in spring as you can work it without creating mud pies. Let the soil rest until the weather is warm enough to sprout seeds and support the growth of young plants. Then you can plant your vegetable garden and watch it spring to life.

Gardening Mistake No. 3: Ignoring Light Requirements

Vegetable plants need sunlight to grow properly and process soil and water nutrients. When choosing your garden spot, make sure that the area gets enough sun to grow the plants you want to put there. Some plants require more sun than others, and those light requirements must be honored when planting your garden.

Check planting recommendations on seed packets before you decide where to plant each seed variety. Some plants need full sun; other plants do well in partial shade. The directions on seed packets will tell you. Plan your vegetable garden before you plant, giving full-sun spots to veggies with the greatest sunlight requirements.

See the rest of this post by clicking the link.

Even though there are so many possible errors you may encounter in your gardening project, do not think of it as something that’s impossible to do. As a matter of fact, gardening becomes a lot simpler and more fun once you get over those mistakes and learn from them. If you come to a point that you get disappointed, just think of the benefits of having a garden at home and you’ll be motivated enough to push through with the DIY home improvement project.

Sunday, February 14, 2016

How To Be Financially Stable When Buying a Home

The decision to purchase a home and the determination of when you should be doing it are two of the most important decisions you’ll make in your life. Living on your own and purchasing your very first house is an endless responsibility. While you pay for your mortgage, you also spend money on things like the maintenance of your home, taxes, improvement and repair costs, and many more. So the thing is buying a home is a very serious responsibility. If you want to succeed and bring the most out of your investment, you first have to be financially stable.

If you want to own a house, save up! (photo credit: GoBankingRates.com)

But how do you do that? This is the purpose of this article – to help you with the entire process. So let’s look at the different tips on you can improve your financial status and become worthy of being called a true homeowner.

Here’s a pretty advice from Parents.com when it comes arriving at the decision of buying a home:

Don’t feel pressured. Instead, make a decision based on your current financial picture. If you’re bogged down with too much debt or if today’s paycheck is stretched so thin that you can’t save for emergencies or retirement, you may not be ready to buy a home yet.

While it may not be possible to pay off every cent of debt before buying a house, do take big steps in that direction. “It’s not unusual for me to see parents with $100,000 in student loans,” says Linda Patchett, a financial adviser in Chapel Hill, NC. “They might want a house today, but it will be much easier for them if they pay off as much debt as possible before they buy.”

What about that old saying “It’s just as cheap to own as to rent”? “That is one of the biggest misconceptions around,” says Greg Van Wyk, a certified financial planner in Austin, TX. “When you look at the tax benefits of ownership, most people still need to pay $1 in mortgage interest in order to get 28 cents back. And there are all kinds of expenses that people never think about in advance, like the garden hose you don’t own, the extra furniture you need to buy, and the repairs you’ve got to make on your furnace.” Higher heating and cooling costs are also huge factors.

If you wish to read this article, visit the link.

The case is simple – if you are currently in debt or if your income is barely supporting you and your family, then it is never a good time to purchase a home. Everything about this huge investment is being financially stable, which literally means you have the money to pay the down payment and the corresponding mortgage payments. If you feel the pressure of buying a house because your age is catching up with you, it’s a huge mistake to give in to that.

(image credit: PhmLoans.com)

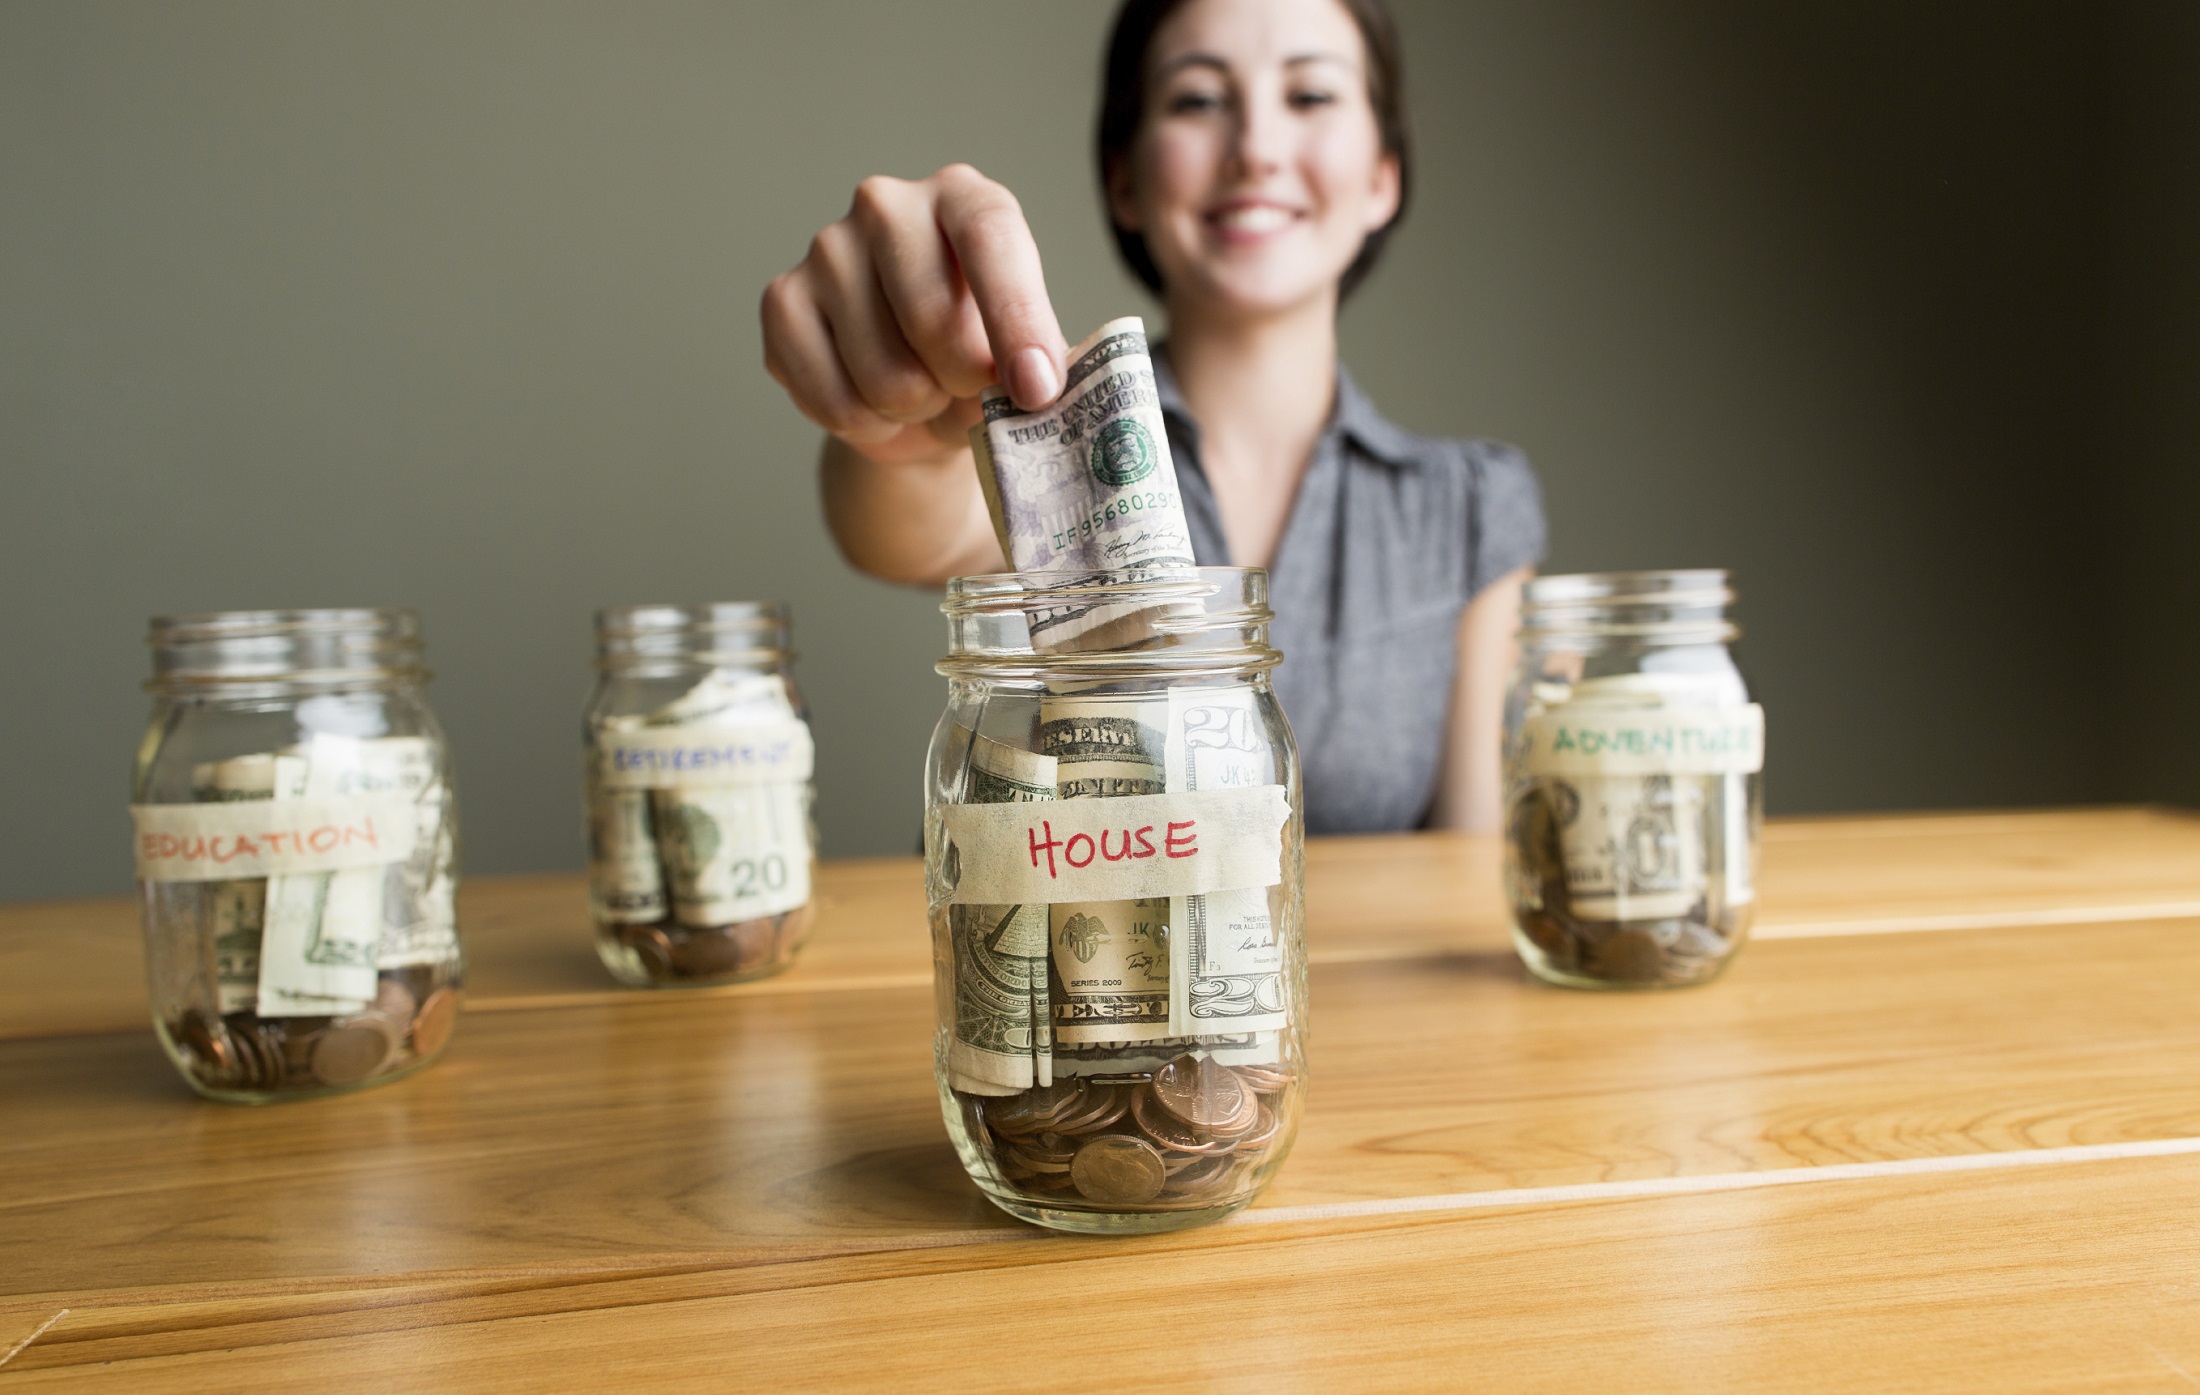
So in relation to that tips above, Moneyning.com, in its post titled “3 Ways to Financially Prepare Before Buying Your First Home” talked about the three things you are to secure. These three actually will make or break your hope of finally having your own home.

1. Create an Emergency Fund

I’m big on emergency funds. A few months ago, I went from working two jobs to one. My take home pay was barely covering my bills, and I had to dip into my emergency fund a few times just to get by.

Now that my income is picking up again, I’m replenishing my emergency fund and working to get $10,000 saved. This will cover just over six months of my normal expenses.

2. Banish Debt

I’m lucky to have never gotten myself deep into debt. While I did rack up a couple thousand dollars in credit card debt when I was younger, it was quickly paid off.

I did, however, take out a $10,000 loan to purchase the trailer I’m living in now. The interest rate is super low, and I’m paying $226 per month with a four-year term. Right now, I just look at this as a living expense similar to rent or mortgage payments. But, before I purchase my own home, this debt will have to be gone.

3. Amass a Big Down Payment

In terms of finances, I now prefer comfortable over minimal. So, I’d like to have around a 50% down payment when I purchase a home.

As I leap more into freelancing, my income is variable — and that’s kind of scary. I’d rather be safe than sorry. Luckily, housing in rural Ohio is very cheap. While 50% might sound like a lot to you, I can probably find a pretty decent house for around $80,000.

It will take some time to save up the 50%, but it’s well worth the wait.

Article source: http://moneyning.com/housing/3-ways-to-financially-prepare-before-buying-your-first-home/

Aside from eliminating all your current debt, you also will need some time to save money for the down payment. Yes, it is true that there are several financing schemes right now that require you minimum or even zero downpayment, but you’ll get killed by the interest rates. You’ll have to wait a little longer but once you save up big time for the down payment, you’ll realize how convenient and stress free it becomes the rest of the way.

Finally, Kiplinger.com, in an article titled “4 Smart Steps to Take Before Buying Your First Home,” mentions improving your credit score as one of the most important steps in making yourself financially stable to own a home.

Your credit score plays an important role in qualifying for a mortgage. A score of 740 or above will help you secure the best interest rates. In the Washington area, for example, that can be as little as 3.6% for a $200,000, 30-year fixed-rate mortgage with a 20% down payment, according to Bankrate.com. (Look up mortgage rates in your area.) If your score is lower than 740, however, expect to pay a higher rate. For that same loan in the D.C. metro region, if your credit score ranges from 680 to 699, the lowest rate you’d be able to get is about 3.9%.

Many young would-be home buyers might find themselves with blemishes on their credit report, thanks to missed student loan or credit card payments. Lucky for me, I learned long before pursuing homeownership that such behavior comes back to haunt you in the form of a low credit score. I’ve changed my bad spending habits and boosted my score. If you check your credit report early, you’ll have ample time to correct any issues. “What you don’t want is to have to address a bunch of mistakes on your credit report while actively looking for a home and trying to get approved for a mortgage loan,” says Gumbinger.

Read the rest of the post by clicking the link.

You eventually will figure out how to make yourself financially capable when it comes to buying a home for the very first time. To be successful at that, you just have to recognize the fact that everything about this endeavor isn’t easy and you will have to wait for some time to be ready. There’s no rush in this one. You can’t afford to make hurried decisions.

Top Things You Need To Secure Before Buying a Home

(image credit: LifeHacker.com)

Buying a home is an adventure and gamble at the same time. It’s a very complex process that will only deemed successful if you take the right steps. If you’ve got the plan of finally purchasing your first home, there are things you need to secure first, the purpose of which is to achieve and ensure success in the biggest investment in life.

In this website called TheSimpleDollar.com, two things we believe are quite important for you to consider when you finally arrive at the decision. See them below, in the article titled “Four Atypical Things to Do Before Buying a House” by Trent Hamm.

1. Save a significant amount each month for at least two years.

A mortgage payment requires financial discipline as well as enough money, period. Can you cover the mortgage? The insurance? The taxes? The constant expenses that go with home ownership?

Use a mortgage calculator to figure up what your monthly mortgage payment will be. Tack 50% on top of that for insurance, taxes, and other expenses. Subtract your current monthly rent payment from that.

If you can’t save that amount each month, then you’re not ready to buy a house of that size.

2. Sell off all of your stuff that you don’t use.

The less stuff you have, the less space you need. The less space you need, the smaller house you need. The smaller house you need, the more likely it is that you’ll be able to afford that house.

Go through your closest. Pare down. Get rid of stuff that you don’t use.

If you sell off a lot of your stuff that you don’t use, you’ll not only realize you don’t need as much space as you thought you did, but you’ll also find that you suddenly have some cash in hand that can help you move towards actually owning a house.

Even better: the less stuff you have, the easier (and less costly) it is to move.

I’m not arguing on behalf of selling off stuff that has value to you. I only suggest that you go through your closets and cupboards and get rid of the stuff that you don’t use. It’s just sitting there taking up space, convincing you that you need more living space, when in fact it could be money in your pocket and freedom in your life.

If you want to read this article in full, click the link.

(image credit: Investopedia.com)

One of the biggest reasons why buying a home requires a long term plan is because you’ll need to save for it. It does not mean you just get up one morning and put in all your savings for the down payment. The coolest thing you can do is save money for say, two years and after that you’ll be more financially stable to get that house you dream of.

According to HGTV.com, it is also very important that you ask the essential questions to yourself before you decide to move on and proceed with the plan. A lot of potential home buyers dream big but when they ask these two questions, they eventually realize they’re not there yet.

Can I afford it?

Buying a house will have a significant impact on your finances, so make sure you can handle it.

Housing is more affordable than ever and incentives like low interest rates and the new expanded tax credit are enticing buyers to enter the market. But purchasing property involves a lot of upfront costs: closing costs, down payment, new furniture, moving expenses. Do you have enough cash?

Create a budget for the monthly mortgage payment and homeownership costs, such as general maintenance if you buy a single-family home or homeowners association fees if you buy a condo.

Am I mortgage-worthy?

Say you saved enough cash, but what about your credit? It’s not a secret that getting a mortgage these days is harder than it used to be. Lenders are looking closely at all documentation of your income, debts, assets and liabilities, to make sure you don’t exceed the maximum debt-to-income ratio. And when it comes to credit scores, the most competitive interest rates (the 5 percent you may have heard about) only go to buyers with credit scores above 700.

The key is to review your financial situation before you check out open houses. Use our affordability calculator to see what kind of monthly mortgage payment you can comfortably afford.

See the rest of the article here.

Those two questions above are probably the most pressing questions you need to answer. There is no way to purchase a home when you know within yourself that you cannot afford it. It’s just impractical and won’t make any sense.

Lastly, LifeHacker.com, in its blog post titled “Top 10 Things You Need to Know Before You Buy a Home,” the writer Melanie Pinola talked about three things that most prospective home buyers don’t usually think about or consider, but are actually very crucial in the entire process of home buying.

Look Out for Deal Breakers

In addition to having your own “must have and want” checklist when buying a home, put these six potential deal-breakers on your need-to-know list: a roof that needs replacing, a home in a high-risk flood zone, issues with sewer lines and other plumbing, restrictive local zoning rules for home improvements, an electrical system that needs updating. You can request a CLUE Report on the home to see every insurance claim made on the home in the last several years, and, in some states, sellers are required by law to disclose any home damage or repairs done. Besides that, while walking through the home, look past attractive finishes like high-end countertops and look for signs of possible big problems, things like cracks in the foundation or water stains on the ceilings or walls.

Buy Less House Than You Can Afford

Many online calculators tell you how much you can afford, based on your current income and debts. It’s best if you can aim for a house even less than what the calculators tell you so you don’t end up house poor. Financial Samurai suggests a 30/30 rule—having the 20% down payment and a 10% buffer in savings and your mortgage less than 30 percent of your gross income. This chart shows the minimum salary you’d need to afford a home in 27 cities. If it doesn’t look like you can afford a home based on these guidelines, look into homebuying programs in your state that provide financial assistance to new homebuyers.

Take Your Time

When you’re looking for a new home to buy, it can feel like you’re pressed to make an offer on any home you’re interested in right now. Relax and take your time shopping around for this major move until you find the home that you’ll love living in for years to come. Shop around for mortgages too, as well as homeowners insurance. When you’ve found the home of your dreams, but it’s already under contract, you can still make a backup offer on that home.

Read the rest of the article from this link.

One of the most critical mistakes a potential home buyer like you can make is making hurried decisions. Keep in mind that purchasing a home is not like getting a used car or buying stuff at a hardware store. You need to give yourself time to contemplate on your options. Once you make a crucial mistake, you realize you can no longer turn back.